Let me just start by saying that this might be my most favorite project I’ve done since starting {Wait Til Your Father Gets Home}. Since we moved into our house, my husband has made it his mission to completely yank out everything from our yard (front, back, sides, the whole-she-bang). The yard we acquired was, to be blunt……a hot mess. We pretty much have a blank canvas to work with now (which is so nice). It’s fun to be able to plan out exactly what we want to put into our yard. It would be even nicer if we could just do it all at once, but unfortunately flowers at Home Depot and Lowes are not free!
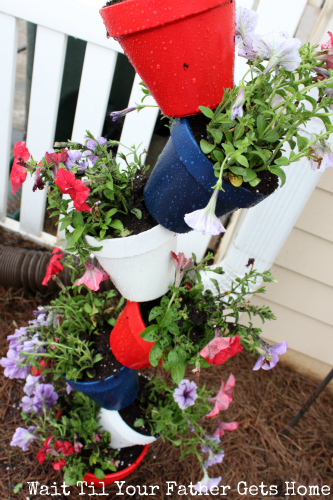
I’ve been perusing Pinterest (as usual) and have come across some really cool planter ideas. This one in particular caught my eye from Home Stories A-Z, so I did what I usually do when I find something I like on Pinterest….I showed my hubby. I always expect him to tell me the things I show him are crazy, or silly, or girly, but he LOVED this concept. He loved it even more when I suggested some red, white, and blue (I mentioned here, that we are quite the patriotic bunch in our household).
I decided to call it…

To make your own version, you’ll need:

- 1-8″ clay pot
- 6-6″ clay pots
- Spray primer (primer in a paint can works just as well)
- Spray Paint (I LOVE Krylon Indoor/Outdoor Paint in Banner Red and Navy Blue–both gloss finish)
- Polyurethane Spray (you could use poly from a can as well)
- 10 ft rebar (found at Lowe’s)
- potting soil (had on hand)
- annuals (of your choosing) We got two flats of petunias since the planter is smack in the middle of full sun for most of the day and had a LOT left over for a second planter project that I will share soon!
- newspaper or tarp (had on hand)


This is really creative! I like funky! One could even plant herbs in those!
http://frugalaintcheap.blogspot.com/
I actually thought about doing another one with herbs in it! Great minds think alike!
The only problem is that these planters take a lot of watering, how do you do your watering without washing the soil out or letting them get too dry?
I found that if I sprayed them with water instead of using a hose, it helped a lot!
This is such a fun and easy idea. Sounds like my kind of project. I’m pinning this.
Thanks! It was fun and super easy. I appreciate the pin 🙂
I agree…it looks Fabulous against the white picket fence!! Love, love love the colors! Great job! I’m pinning this one!
Thanks! Glad you like it!
I like this project, I love the colors you choose for the pots. I am your new linky follower.
Oh I love your planter. I might have to make one of these. Please come share at my linky party tomorrow.
Thanks! I’ll be sure to stop by and submit it 🙂
I really love this project. I’m wondering if it will work for growing things like an herb garden?
I think I’m going to make another for herbs….I’m sure it would work beautifully!!
I love it! Not sure it would hold up to our winds here in the plains ( I can see pots twirling on the re-bar), but maybe the pots could be glued to each other?? Thanks for the inspiration!
I bet you could definitely apply some sort of heavy duty glue to make it work for you! I’d also put it near a wall to help with some of the wind as well!
That’s way cool!! Love it! Thanks for entering One Crafty Contest; good luck!
Thank you! 🙂
Love this and what a great tutorial on how to make it! I am pinning it!
Thanks! Glad you like it 🙂
I love it! I am so going to try this in my Garden!
I’m so glad! I’d love to see your version 🙂
Stopping by again. After seeing yours I had to make one of my own! I didn’t glue it yet, waiting to see if it will hold up on its own first. If you want to see mine here is the link (and I linked back to yours too).
Amy
http://yellowhouseon3rd.blogspot.com/2012/05/outdoor-changes.html
Wow, this is so cool and FUN! My kids would totally love it too. 🙂 I love the patriotic colors and it would be fun to come up with other color combos as well. Found you on TT&J’s linky party! Have a great day.
Thanks! The possibilities are endless with colors, aren’t they?!
Ha! I love “the mad planter” name. The topsy turvy look is so, so cute. Thanks for sharing at oopsey daisy!
Thanks Alison! I love your Link Party and always try to link up each week!
I love your mad planter!
I am new to your blog, so don’t know much about you, but in this post you mentioned you were redoing your yard. When my brother moved to a new house, he bought trees and bushes, but when it came to the perennials, he got seeds and starts from family and neighbors. We have shared with each other lilacs, daisies, poppies iris, lilies, poppies, tulips, ranunculus, peonies, hosta, bee balm, and many more. Do you have any neighbors or family who will share plants with you? You might also want to consider placing an add asking for starts or seeds in your local newspaper’s free classified section. Is there a freecycle group in your area? I got some beautiful iris from a freecycle add. I’ve since shared starts of them with an aunt and with neighbors. Flowering plants pack a punch in the landscape and the added bonus of getting someone to share them with you is you get to think happy thoughts about the person who shared every year when the plants bloom.
I love nthis one and am going to make one this weekend
Thanks! Glad you like the design!
Love this! I saw Beth’s, and I’m sure a lot of people are going to be using her great idea. The idea of doing it in red, white, and blue is really cool–instant decor for Memorial Day and Independence Day!
Thanks so much for joining Grace at Home! I really appreciate it. 🙂
Thanks! Love your blog 🙂
Featuring YOU today! Thanks so much for sharing at {wow me] wednesday.
Ginger @ gingersnapcrafts.com
http://www.gingersnapcrafts.com/2012/05/take-look-at-you-mothers-day-edition.html
Awesome! Thanks for the feature! 🙂
These are beautiful! Thanks so much for linking up to Fabulous Friday. I hope you will link up again this week. I’m featuring you today!
http://www.herecomesthesun-kelly.blogspot.com/2012/05/fabulous-friday-25.html
Absolutely, love your link party! Thanks for the feature! 🙂
So cute! Love the colors you chose for the pots and plants. I think it’s also called tipsy pots?
This caught my eye at Here Comes the Sun. Congrats on the feature. I love it. I would love to invite you to link up on my first time ever Link Party. Hope to see you there.
PS I am already planning on where to put my Mad Hatter
Thanks! Yes, I’ve seen a few on Pinterest with a few different names! Glad you’re planning on making one!
I am so glad you linked up on my first Freedom Fridays:) FYY I have had so many repins on pinterest on your Mad Hatter that my inbox is smoking. LOL You should be getting a thousand hits on it.
Happy to link up! I’ll follow you on Pinterest too :o)
I have seen these all over, thanks for the tutorial! I definetly think it is something I could do. 🙂
No problem! And, yes! You should try it!! You’ll love it 🙂
Wow! What a fun idea! I love the patriotic colors. Great job!! Thanks so much for entering into the Project Pinterest Challenge! Good Luck!
Jill
twoyellowbirdsdecor.blogspot.com
Love it! Pinned.
So glad you like it!
This turned out lovely the colors selected are eye catching! I discovered you on Two Yellow Birds and I’m now following. I would appreciate if you could follow back. Txs
This is such a cute idea. I bought the pots, rebar and all the other material and made mine today. I am a bit confused with the rebar. I bought a 10 feoot stick and after stringing my pots I still have quite a bit of the rebar sticking up above the last pot that I strung. I buried the rebar 2 feet in the ground which would have left 8 ft exposed and ready for stringing my pots. What did I do wrong? I bought one 8 inch pot and 6- 6 inch pots.
Thanks
I would just try to hit the rebar with a mallet a little bit more until it isn’t exposed anymore. We had to do that too! Glad you like the project!
So cute love the bird one
Love this project, I can’t wait to try this. Have you tried this for inside?
No I haven’t. I probably wouldn’t put anything like that inside for quite some time with a little one running around. I could see it working for some people though 🙂
Have you tried for the inside of your house?
Absolutely love it!
I love this idea, but I have a question I live in an appt. complex and I have a balcony, is there any other way I can create this without drilling the rebar?
I bet you could just do a smaller version (maybe three pots) and make sure the dirt is really packed in on the bottom pot! Let me know how it turns out!!
I love The Mad Hatter. I was not sure what you meant by stringing the hole in the bottom of the pot. Are all of the holes in the exact middle of the pots or staggered to the side. Please explain. Thanks
Thanks! The holes should all be right in the middle, so just have the rebar go through those holes and tilt the pots.
When you ” seal the pots with some polyurethane”, was that inside & out?
Yes, I did both inside and out…anywhere there was paint.
Absolutely Stunning, Loved It!
Looks AMAZING in our backyard!
Love your Idea! Just pinned it.